I started working on the new garments for Julia Tudor, who will be getting married in 1872. Based on the lovely drawing in the 1872 La Mode Illustree, she will be wearing an ivory silk satin with blush silk trimming, French lace undersleeves, and a bobinet veil.
Of course before she can don her bridal finery, she must have the appropriate undergarments. I have completed the following so far.
A fine batiste chemise with delicate lace on the neck and arm openings.
Delicate batiste drawers featuring tucks, hem lace and white embroidery in a tulip stitch.
Please ignore the messy work table!
A gold silk taffeta corset, boned and fully lined, featuring orange blossoms embroidered on the front.
Orange blossoms for good fortuneBack view showing lacing
Still to be finished are a practical corset cover of crisp cotton, a luscious petticoat featuring tucks, insertion and also lace at the hem, and an empire hoop of cotton/linen blend. I will share more as they come!
I have a number of things I want to work on this year now Ruby is completed.
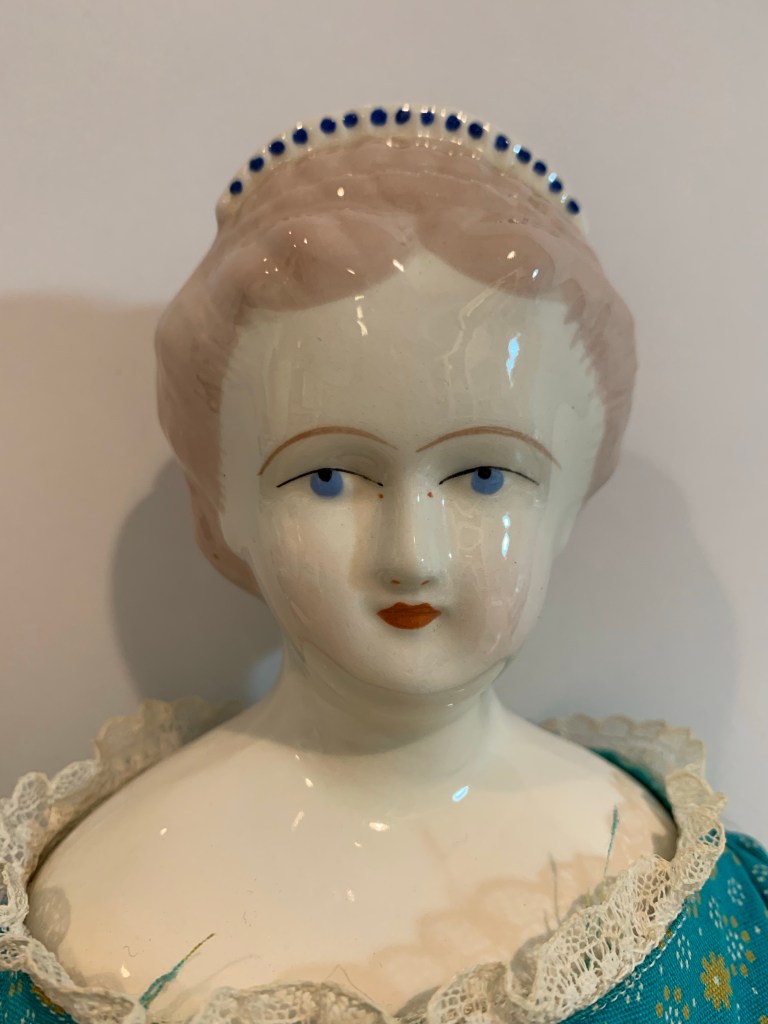
Julia Tudor
This doll is about 20” tall and will make a lovely bride. She has a tiara on her head and I am trying to figure out how to make a veil stay in place. My vision is an 1872 wedding dress in ivory and blush pink. Or it could be blush pink with ivory, I haven’t finalized that yet. I’m drafting the pattern from the 1872 La Mode Illustree’ and so far there is only one confusing bit.
Preparing for her upcoming matrimony
Amelia
I’d like to make an 1850s styled doll and give her a Bloomer Suit. This fashion was popularized by Amelia Bloomer, hence the name. I’m undecided if I will use a china headed doll or make a cloth lady doll for this. 1850s heads are rare and expensive. If I decide to make a cloth lady doll, I will try a Susan Sirkis method for attaching hair.
Could be interesting!
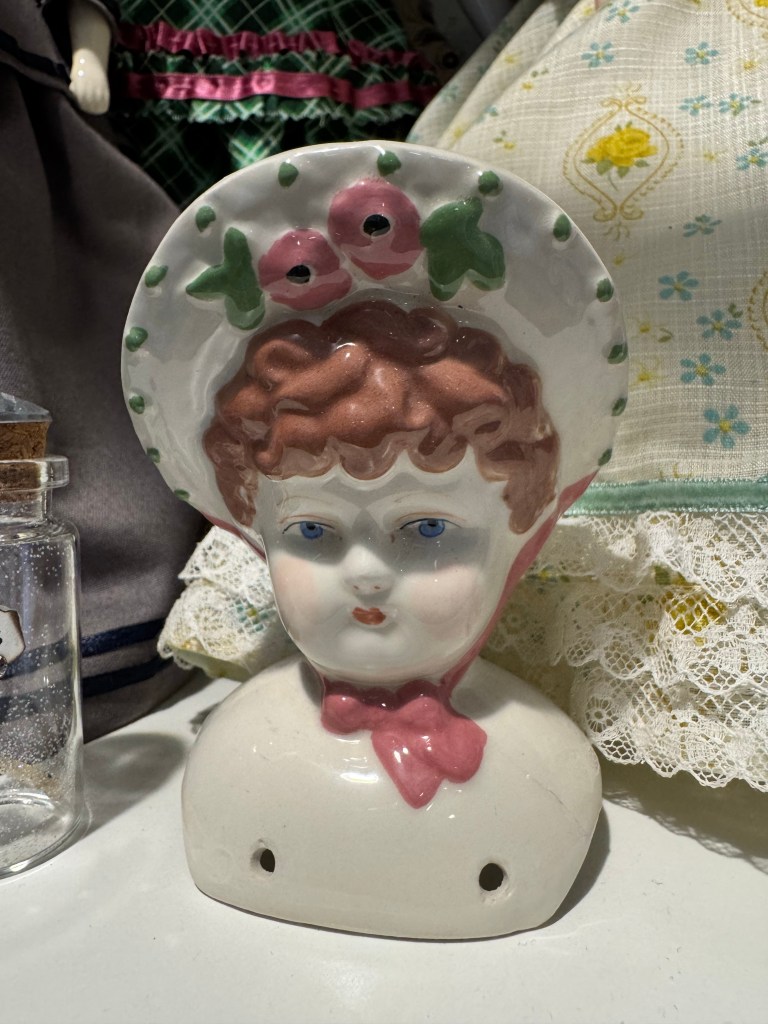
Amy Tudor
It’s a stretch goal for me but I would like to make this pretty bonnet head doll. I only have the head so I’ll need to decide if I will purchase china arms and legs or make fabric ones. Bonnet head dolls are based on 1840s styles even though they were produced around 1910 apparently. I’d like to dip into this time period though as I know nothing about it.
I’d like hands and feet, please
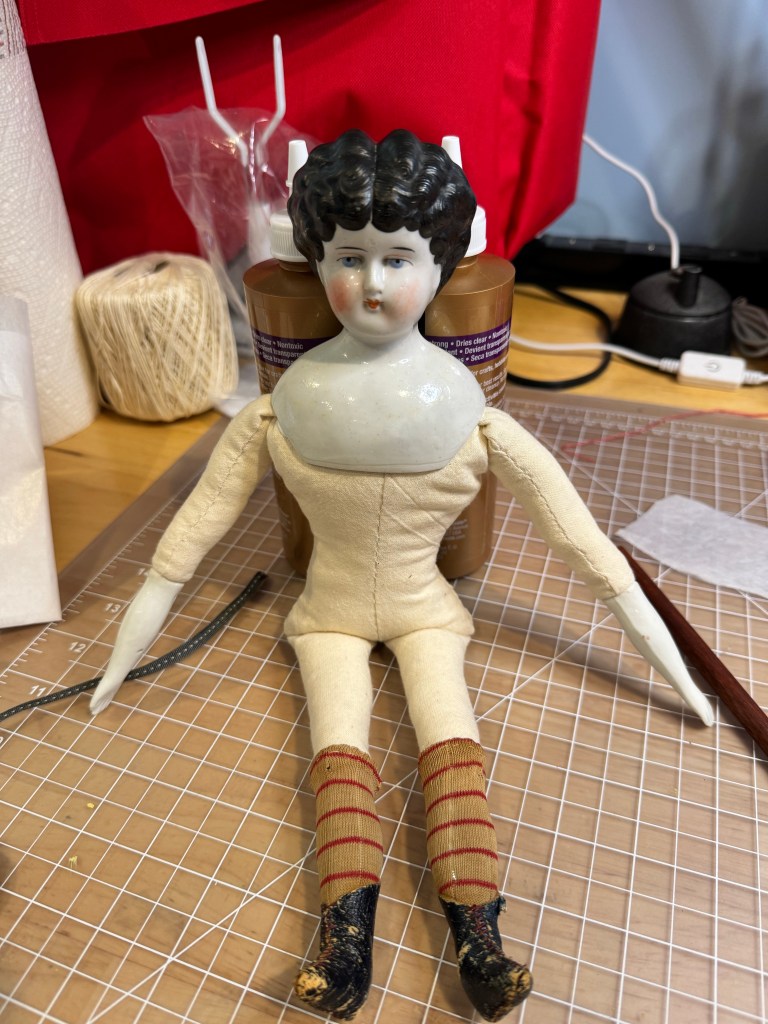
Minerva
This beautiful doll doesn’t need much but a repair to her broken foot. I had an idea that I could make boots and stockings, fill them with emery or something similar, then fit them to the broken china on her foot, pull up the stockings to hide the transition. We shall see. I got this idea from Ruby actually since she has her own boots and stockings.
My foot hurts!
Charlotte
I just acquired a 3” tall frozen Charlotte doll. Of course she’s nude. Clothing her will be a challenge due to her itty bitty size so that could be a fun little project. I have some ideas based on other frozen Charlottes with clothing I have seen.
Brr it’s so cold I’m frozen!
So there you have it – my ambitious goals for the year. Of course I’ll be posting here with my progress. And no, I haven’t forgotten the various other dolls I have to work on, they just might need to wait until 2026 lol.
Did you know I have an Instagram where I post lots of interim photos of my work? Look for me under norkio and follow for progress shots and other fun stuff.
There isn’t really much to say about this except that I am tremendously pleased with the results! Please enjoy the grand reveal of Ruby’s wardrobe and body remake. She is currently packed up and ready to be shipped to her owner, my cousin M.
Click here to see all the posts about Ruby and read about her restoration.
I have been posting progress pictures over on my Instagram and just realized I hadn’t posted anything here in a while! I’ve made great progress on Ruby’s wardrobe. I won’t say we are on the homestretch, but the only thing left to make is her bodice, so we are almost there!
The last post I made was about her completed undergarments and since then I have completed the skirt and drape for her dress. In the 1880s, women’s dresses sometimes had asymmetrical features, like drapes that were pointed on one side, lapels only on one side of the bodice, things like that.
As an aside, funny how 100 years later in the 1980s, I myself wore asymmetrical styles – I had a wide leather belt that was wide on one side and the skinny end overlapped at the waist. And we can’t forget the bib front shirts that were meant to be worn half unbuttoned. Anyway, that’s a funny thing about fashion – everything old is new again.
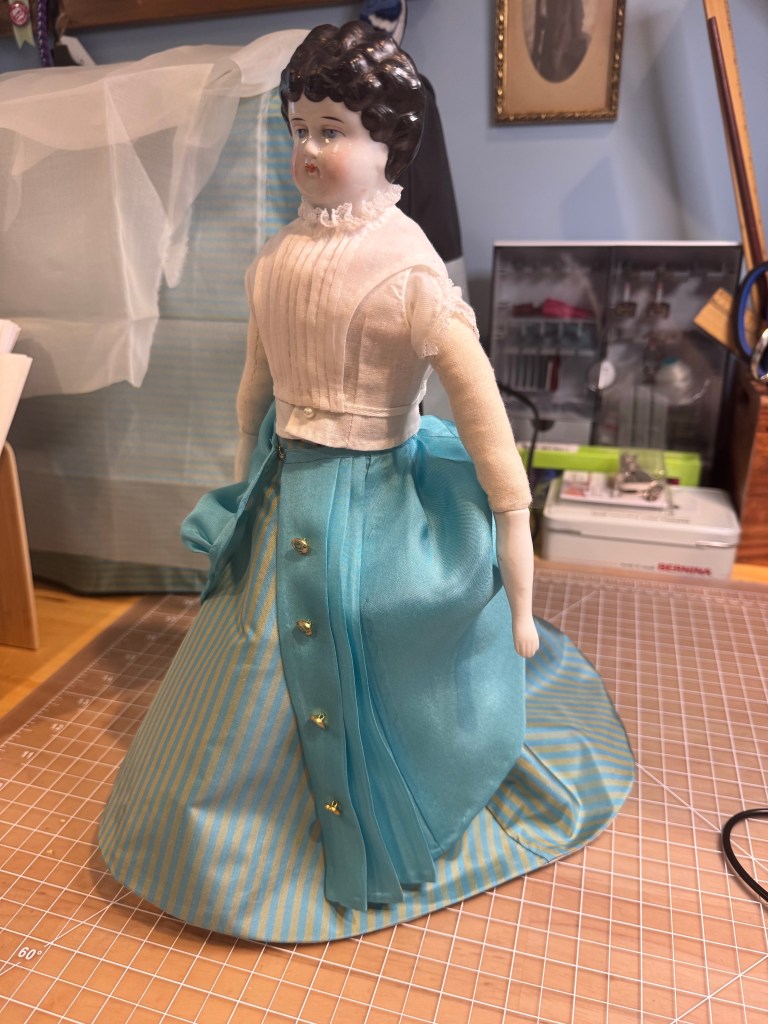
Here is the front of the lovely silk taffeta skirt. I really agonized before making this because the side panels are curved and I was really concerned the stripes would go awry on the side and back.
I was worried over nothing! The two large pleats on the side back take up much of the curved edge and in a way, correct the direction of the stripes.
The bustled look is accomplished by adding a set of tapes across the back of the skirt and then drawing up the tapes and tying them into place. I do know this method was used on original dresses back in the day. Here you can see the bias strip of batiste and the tape before it’s been cut in the center. The bias is stitched through both the lining and the outer fabric but for much of the rest of the skirt stitches are placed only through the lining for a very clean look.
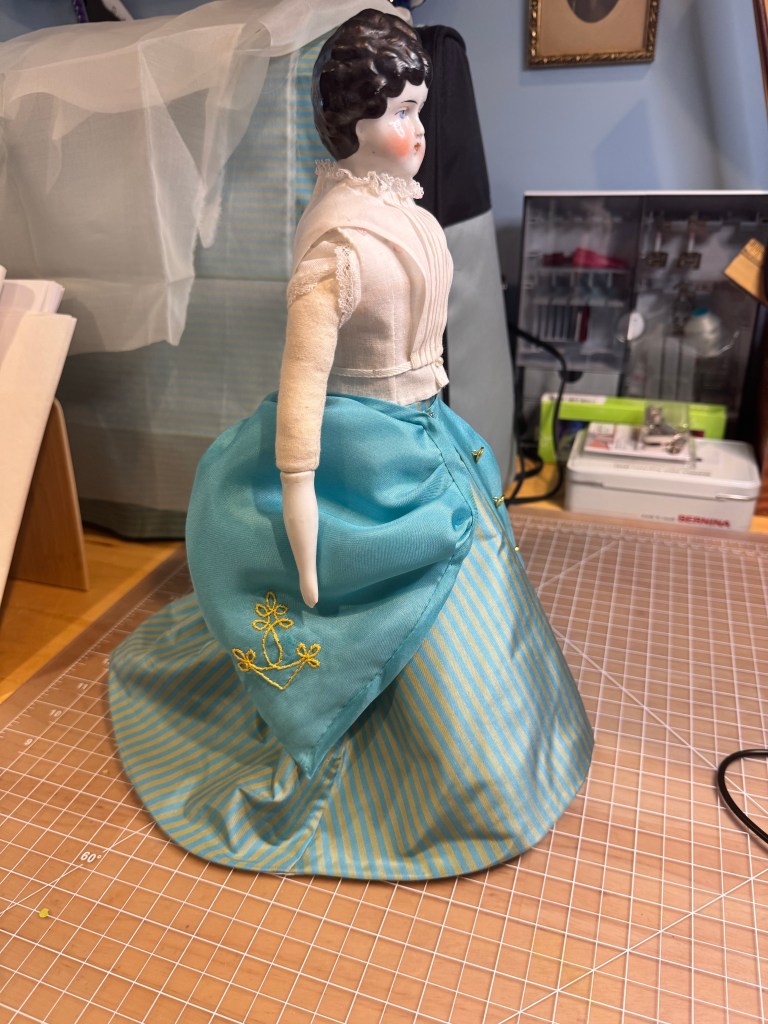
Here’s the back of the skirt with the tapes drawn and tied. This silk taffeta is so luscious to work with. I wish all fabrics were as nice!
The next layer is the drape, and of course Susan Sirkus patterns are fiddly at best! I ended up writing out the instructions separately because much was missing from the method. At no point do the instructions tell you to hem the edges – one of my big complaints about her patterns.
But whatever, I know how to sew and what needs to happen to bring a garment together thankfully, but over and over I realize the Wish Booklets are just not for beginner sewers.
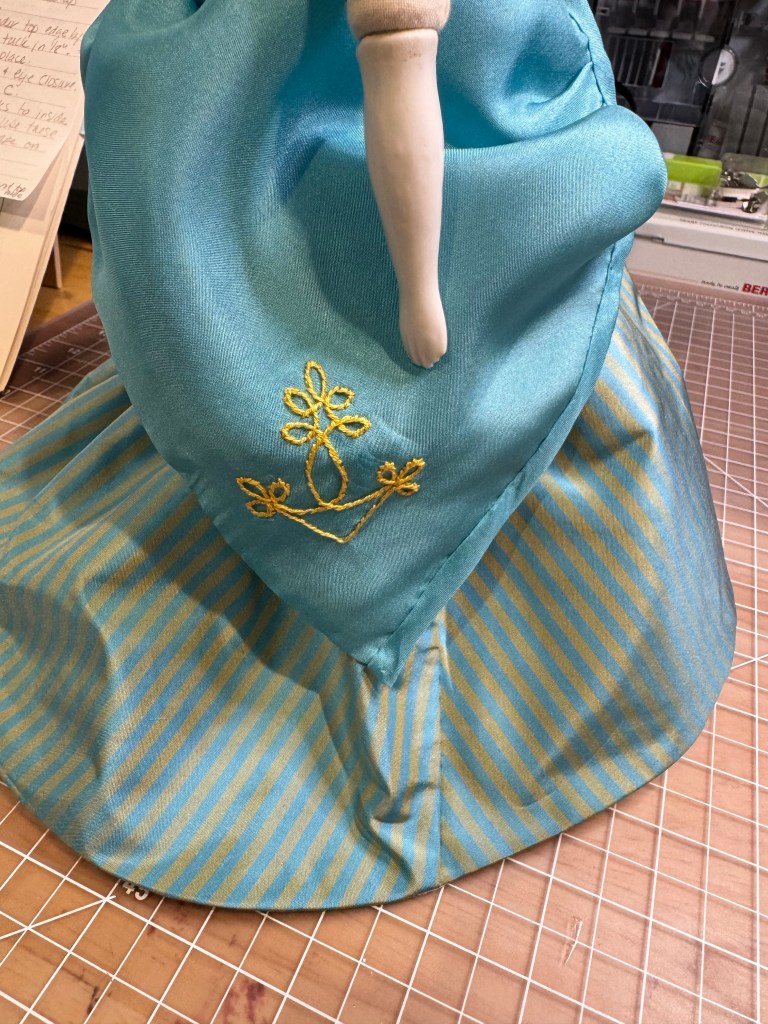
I used a softer silk for the drape that is just the color of the blue stripes in the taffeta and it coordinates perfectly. And because the Victorian era was one of embellishment, I decided some kind of design should be added to the drape. At first I thought maybe trim around the lower edge, but instead decided on an embroidered motif.
I found this design in the book A French Fashion Doll’s Wardrobe. It’s one continuous line.
Based on the image in the Wish Booklet, this part of the drape should lay across the side front, but it doesn’t. I just can’t get it to stay there. I know I followed all the instructions and was very careful in the construction, but this drape just sits high on the bustled skirt underneath.
I also have issues with where the pleats on the front fall. It’s one of those things – the drawing just doesn’t match the reality. Is this a problem? No. Does it bother me? A little.
And also based on the drawing, this back portion should cover the bustle instead of whatever it’s doing here.
But overall I still quite like the drape and how it works with the skirt. Could I redo it – yes of course and I could make changes based on my experiences. Is it worth it – no, it probably isn’t. This is a dress for a doll, not a live person.
I used these lovely cloisonné buttons I have had forever that just so happen to be perfect for this dress!
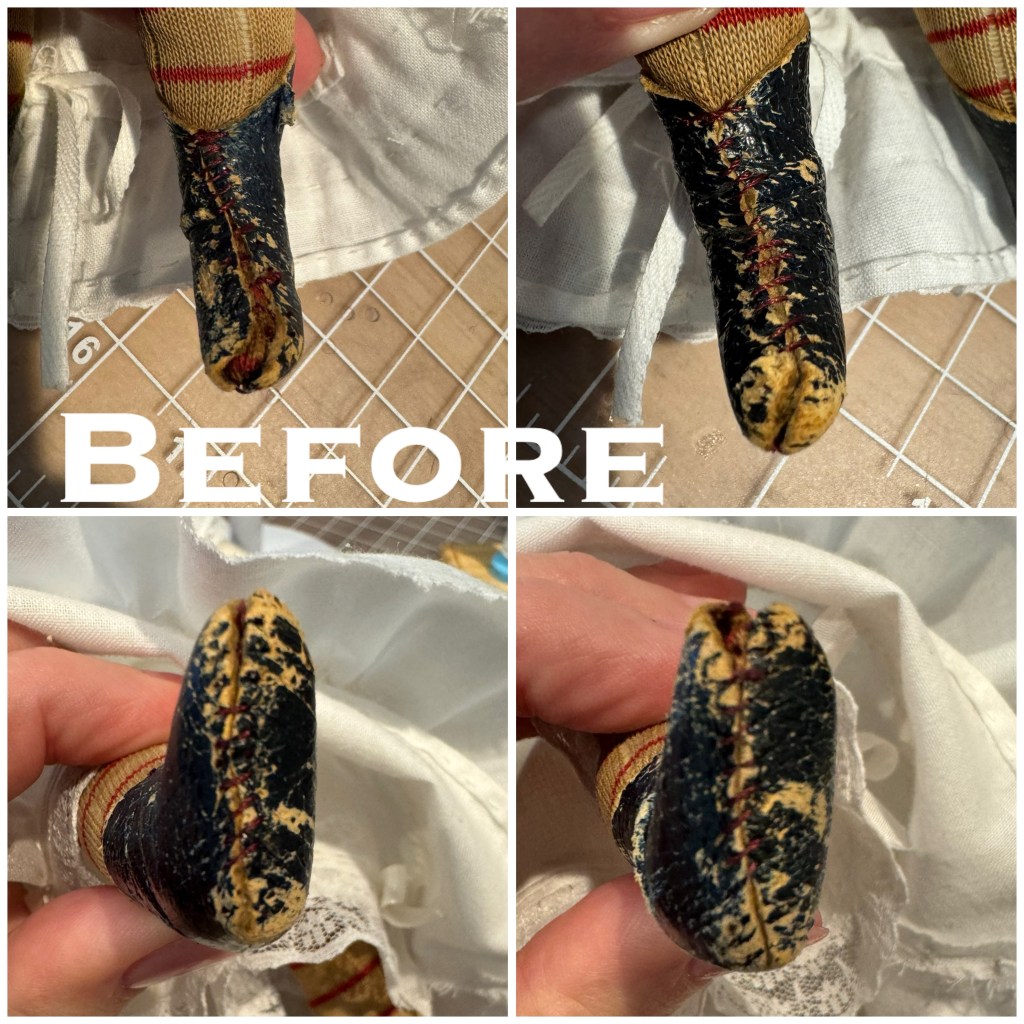
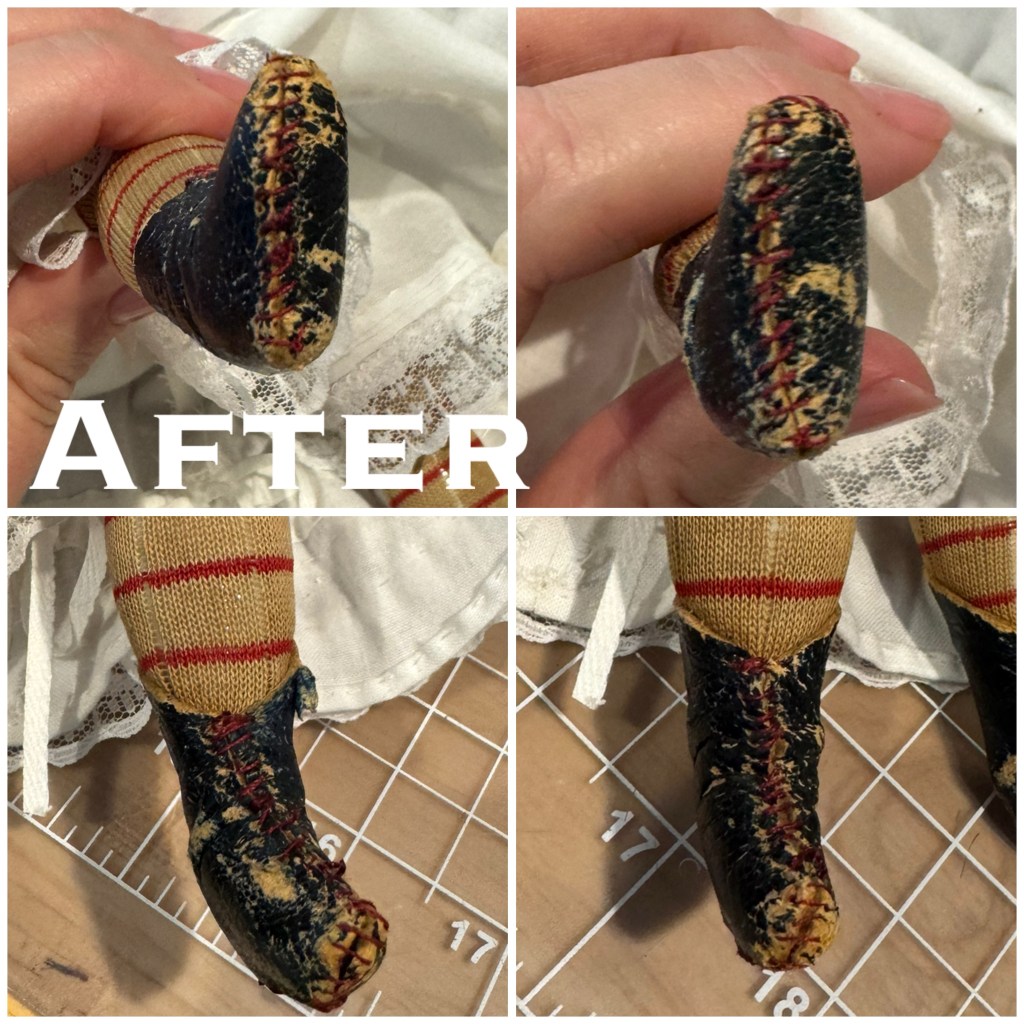
I had to make a repair to Ruby’s boots the other day. I think the amount of handling & disturbance has been more than they should have experienced. I noticed that the threads literally disintegrated.
You can see how the threads just…disappeared. I literally gasped in shock when I noticed it. And dismay that I didn’t think to protect them better, but I have a solution there. More on that in a moment.
I quickly found some thread that matches the deep red color of the original stitching, and stitched. In most cases I was able to use the original holes.
While I am glad to have stitched the boots back together I’m not going to risk any more damage. I’ve wrapped her feet in soft cotton for the remainder of the project!
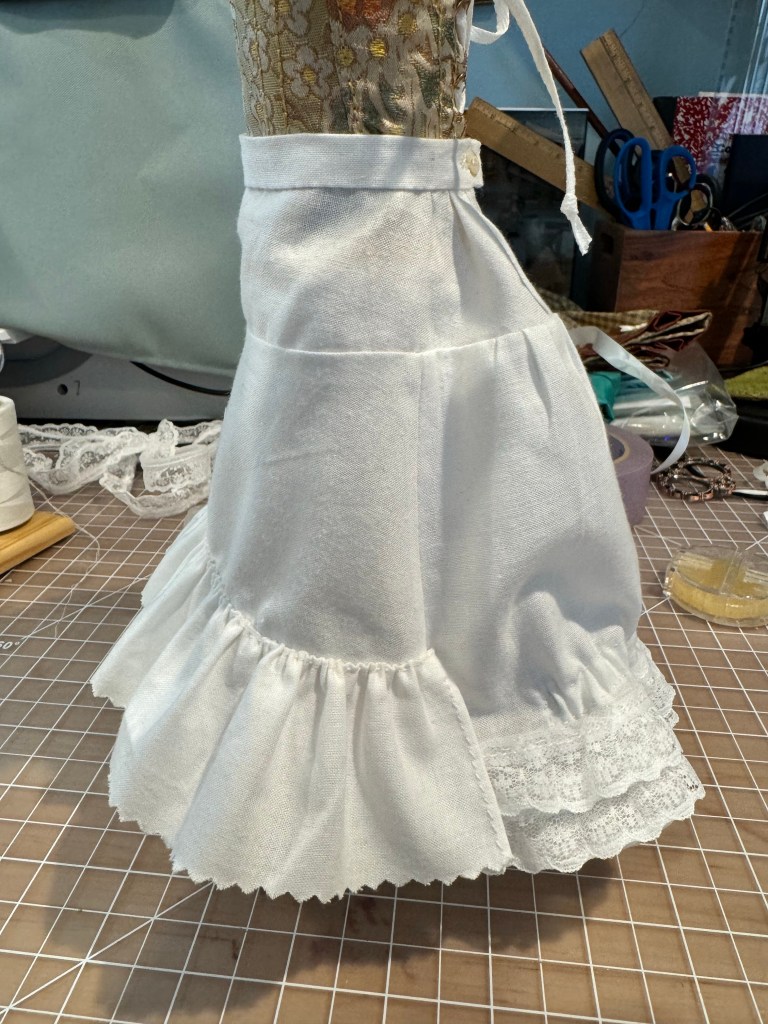
This long weekend in the USA was great for making progress on Ruby’s wardrobe. I finished her petticoat and cushion bustle, and also decided to make a corset cover. All turned out quite nicely. First up was the petticoat.
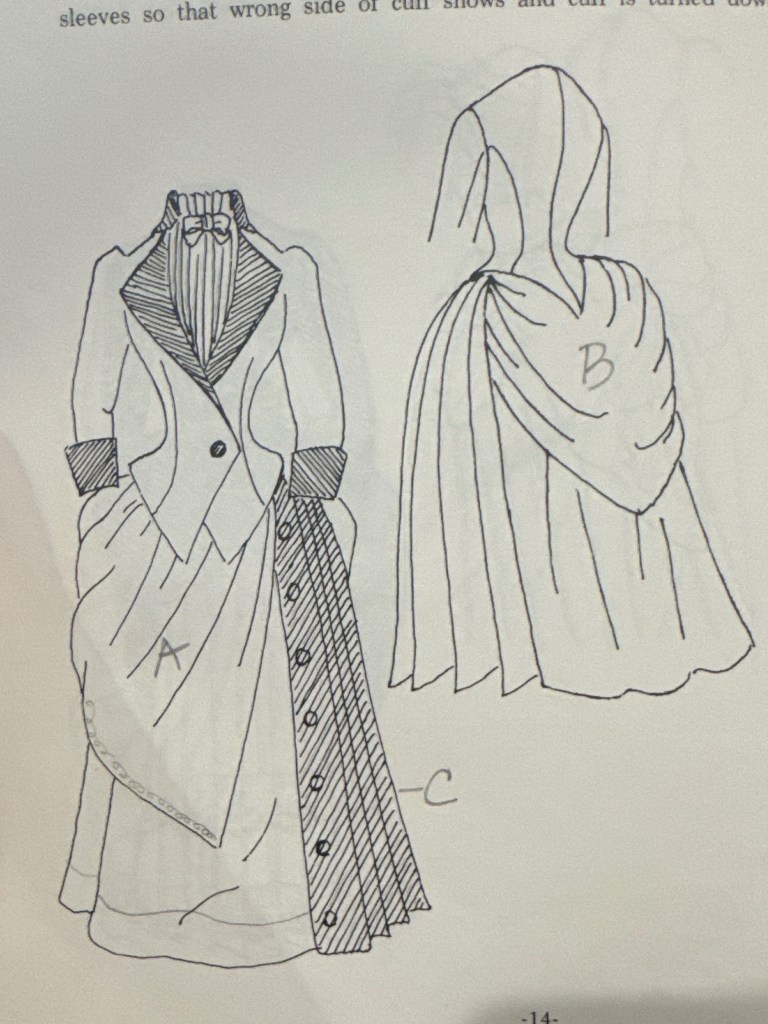
Ok this is what it is supposed to look like. The gathered back is created by adding adjustable tapes on the inside of the garment.
That’s one side of the back. Unfortunately after I stitched that side, I made the other side incorrectly and the tape was on the outside. It was the end of the day and I knew better so I set it aside for the next sewing day.
After fixing that, I realized a minor detail – I had sewn the bias strip all the way to the edge of the piece, but really should have stopped 1/4” from the edge for a seam allowance. Le sigh, I had to pull a couple stitches but that really was a minor error. Yes, I could blame the vague instructions but honestly, I know better.
The front was supposed to have a pleated trim but I chose to do a ruffle because I hate making small scale pleats. That’s just me.
You may notice that on the drawing above, the back gathering from the tapes is well above the ruffled trim, but in reality that’s only about an inch from the lower edge! I suppose the intent was to add the ruffles and pleats to the hem – an extension of the length. With the yoke and waistband the petticoat is long enough and it wouldn’t make sense to add on this length so I applied it on top of the skirt as I have seen on historical garments. I used a gathered lace for the back and I like the outcome.
I made the closure with a mother of pearl button.
How do you think that compares to the drawing? Pretty close I’d say.
After finishing the petticoat I made the cushion bustle. This item is basically a lightly padded rectangle, folded onto itself and secured on a waistband. The pattern is plain so I chose to add the lace on the edges – because really, the Victorian age was a really embellished era. Why not add lace to your bustle?
The bustle helps achieve the large “backside” shape that was so desirable in the 1880s. There were many styles available and this is one example.
After thinking forward to the beginnings of the dress, I realized the next item necessary would be a corset cover. Because the corset is a darker color and the blouse layer would be fine white, there is a chance the corset would show through. The Wish Booklet includes a pattern for what they call a petticoat bodice. I haven’t heard this exact term but I recognize the piece as a corset cover.
The actual pattern was too long so I shortened it. I rather like the embroidery and the pearl buttons.
So there you have it. The undergarments for Ruby are completed and I can begin thinking about her dress finally!
Check out my instagram where you can see a video of everything. @norkio
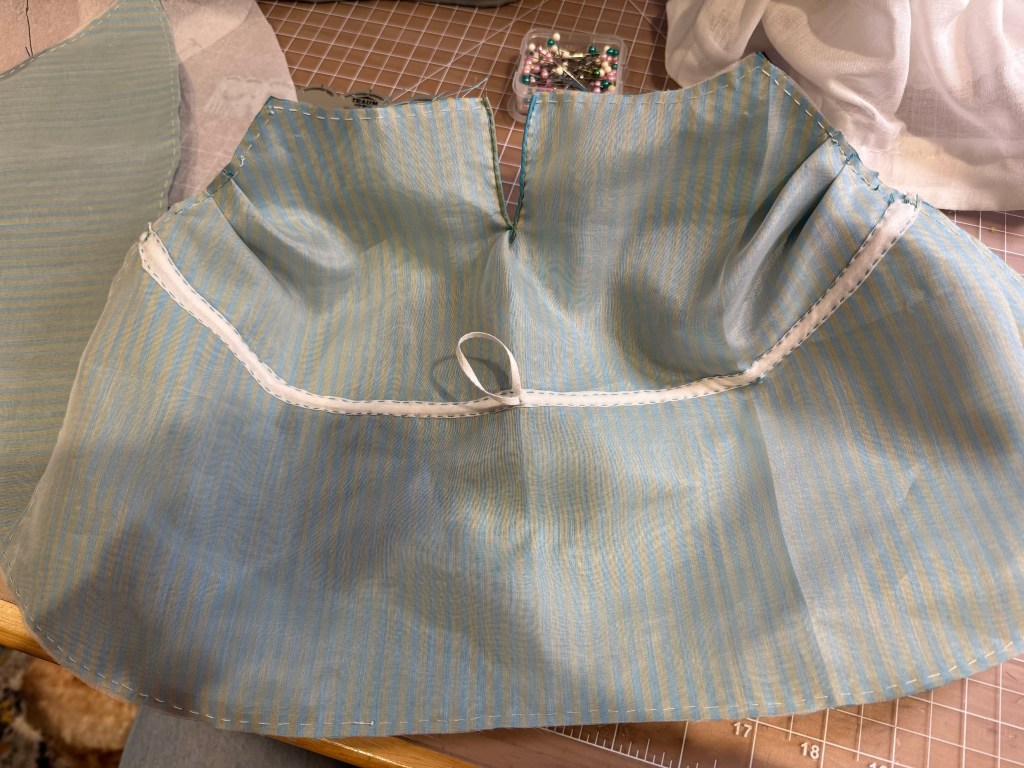
I’ve started working on Ruby’s next undergarment, which is a petticoat.
After upsizing the pattern a bit to fit her, I carefully read the instructions. The drawing is a smidge deceptive!
The pattern piece just looks like a typical skirt piece. But, the pleated front trim and ruffled back are added on top of the base piece. I thought I was going to be making a separate hem piece to add to the lower edge of the petticoat. Frankly I’m relieved as adding it to the base is a lot easier.
I’m using a lightweight linen for the petticoat, bias tape for the casings and 1/8” twill tape for the inner tapes. Once assembled, the inner tapes can be drawn up and tied to create a nice pouf on the derrière.
The tapes are sewn to the inside of the piece so the outside is nice and tidy. However, it’s the end of the day and I sewed one side correctly and the other incorrectly. Urg. I will pick it up again another day!
I’m coming to realize that the dolls I sew for are FAR better dressed than I have ever been or ever will be. You have seen the chemise and fussy drawers that Ruby is now enjoying. Lovely soft cotton voile with silken trims and lace. Ooh la la.
The next garment I have made for Ruby is really, if I don’t say so myself, amazing. Just because a lady is 130 odd years old does not mean she wants any old clothing, am I right? So, Ruby and I talked – it was a bit one sided if you must know – and she told me how she has always wanted a decadent silk brocade corset.
And how could I say no to that?? For my own reenacting adventures, I have a lovely coutil corset with fancy lace trim. I know how it makes ME feel, so yes, Ruby would like to feel fancy too. No doubt!
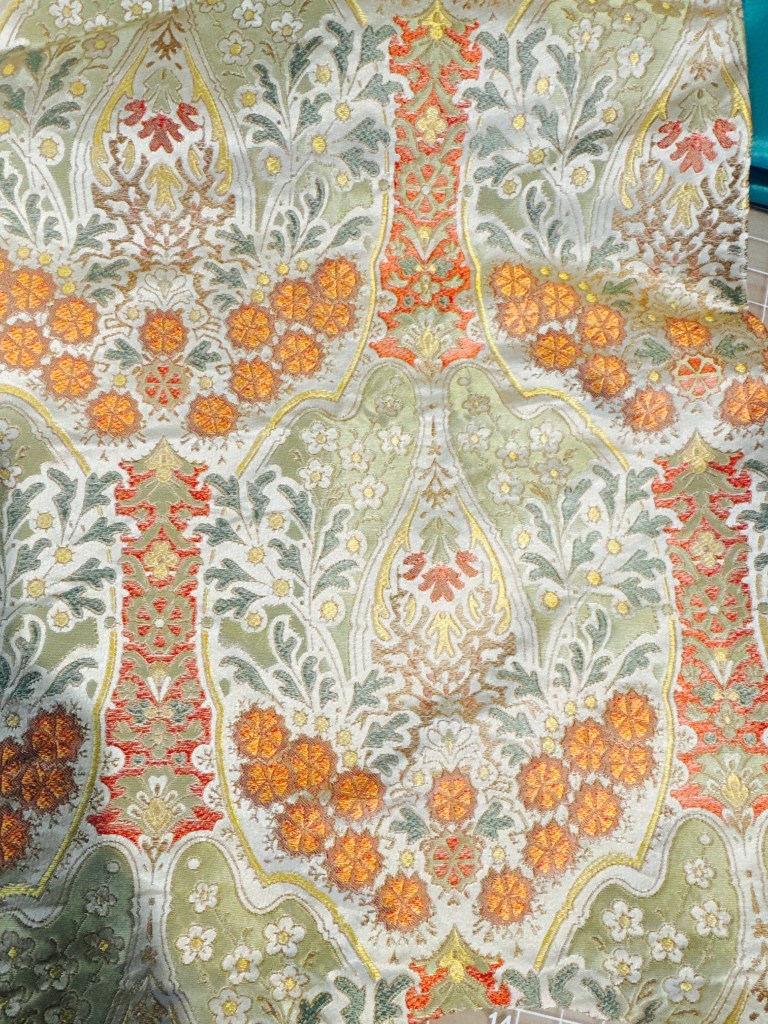
I looked into my silks and found “just the thing” for this project. It’s a gorgeous silk brocade in autumn colors. I particularly like the rust-colored flowers and green botanicals.
Caroline was kind enough to lend her corset to Ruby to try on, and it is a good fit. I pulled out the pattern I drafted for Caroline which was drawn from the book —- A French Fashion Doll’s Wardrobe by Louise Hedrick. When I made the corset for Caroline I followed the instructions but I had been a bit surprised the garment was only a single layer of fabric.
This time I decided to make it with a cotton lining, more similar to how IRL corsets are constructed. To complete this, I cut each piece in the silk brocade and also in white cotton. The two layers are stitched separately, then placed right sides together to stitch the center back seam. The piece was then turned right side out for the top stitching that creates some of the structure and also the boning channels.
I realized as I was creating this garment for Ruby that I made a slight error on Caroline’s. It doesn’t impact the actual item so I won’t change it.
The top stitching is done in a golden wheat colored silk thread, doubled. The back stitch adds an attractive detail and has the duel purpose of binding the two layers securely. It’s like the pieces are quilted together.
There are five bones in the corset – center front, one on each side of center back, and one each angled on the side front. If you decide to undertake this project I recommend angling the ends of the side front bones so they fit neatly into the channel.
The last couple steps are adding the grommets and binding the edges. I happened to have this silk ribbon that perfectly matches the thread I’ve been using. And I love that the brass grommets work perfectly with the fabric.
Et voila! Ruby looks lovely in her new, fancy corset!
I’ve finally dedicated some time to work on Ruby’s drawers and they were so fussy and fiddly! I decided to use the Susan Sirkis Wish Booklet WB 23 Fashions 1880-1885.
The Wish Booklets are wonderful with lots of patterns that are relatively easy to follow…if you understand garment construction and have some knowledge of period techniques. The original chemise I made was based on a different pattern because I wanted something closer to what is shown in the Bloomingdale’s Illustrated 1886.
The drawers however are a sweet design and just fine for Ruby.
Many of the reproduction doll patterns I have seen and used include some errors, omissions and sometimes just confusing instructions. I remind myself they are written by humans (fallible as we may be) and rely on my sewing experience to fill in any gaps. In these drawers for example, there is no instruction to hem them or to add the lace trim.
Should you wish to make these drawers, I suggest you make a rolled hem before starting, and then make your pin tucks, or adjust the placement of your pin tucks up a quarter inch so you have space to hem and add the lace at the end.
Also, there’s no mention of added the bows shown in the drawing but that could be put down to it just being a suggestion. I liked the look and added silk ribbon bows.
I also chose to use French seams since voile can fray just as badly as silk! Being such a fine fabric it is very delicate, but gives such a lovely result. Another step not really mentioned is the waistband. While the instructions do indicate the yoke should be set to a narrow waistband, there is no mention to add ease stitching since the yoke has bias edges. Again, not too difficult to figure out.
They fit Ruby nicely and I closed them with a hook and thread bar. I think a button would add unnecessary bulk.
I’m tickled that I can share with you the new body created for Ruby. I was very happy to save her original stockings and shoes!
Ta-da!
I’m tempted to open her up and add some more stuffing to make her body more firm. The more I work with her the softer the cotton stuffing becomes. She has been filled with 100% organic cotton.
Her head was glued with Aileen’s tacky glue. I hope it holds for as long as the original glue did. For that matter I would be thrilled if her new body lasts as long as her original did!
My name is…
I also created her first piece of clothing. It’s a sweet chemise of the softest 100% cotton voile. The lace is also 100% cotton from my favorite heirloom sewing site Farmhouse Fabrics. The button is a vintage mother of pearl with the 2-hole “eye” look.
Ah, new clothes
I looked at the Bloomingdale’s Illustrated catalog for design inspiration. The placket front was very popular in 1886.
Next I will move on to some drawers and a petticoat. See you again soon!